Showing posts with label tutorials. Show all posts

Tuesday, August 28, 2012

Origami Heart Box

Recently, I was asked to fold a jewellery box.  However, a plan square box wouldn’t do.  It wasn’t long to find the perfect design!  This is the Heart Box designed by Robin Glynn. 

IMG_8042 copyThis box is folded by one standard North American letter sized paper (8.5 x 11 inches).   The lid and base are made from making only one lengthwise cut. 

The magnitude of this fact is important.  Most of us have readily available in offices, school and at home.   Sometimes handmade or high end quality paper and sampling is often cut to 8.5 by 11. 

If you are looking for high quality handmade paper with beautiful designs, try The Paper Place, most of their paper designs will offer this size.

The original instructions was based on A4 sized paper (210mm x 297mm).  You can do a web search for more examples, but these are the ones I found for my project

The final size of this box ends up to be 3 inches lengthwise on the lid and 3 inches @ the widest part.  Perfect to gift a ring or earrings.

IMG_8047 copyThis heart box had to house a necklace so needed a sheet twice as large and I needed it in a hurry.  Lucky for me, there was Deserres!  They carry large format sheets that I cut to size.  As you see here, I put in adders so the necklace would be displayed nicely. 

This was the first origami project I invested time in since temporarily closing shop.  It was very enjoyable folding experience, and it’s a useful item to make!

Friday, December 9, 2011

Tutorial: Snowman Magnets


More Snowman Crafts! This Time…Magnets!

Another tutorial generously offered by Eyeballs by Day, Crafts by Night.

Wednesday, May 4, 2011

Tutorial: 3D Spring Flowers Card

I absolutely love this card idea.  I’m not into the sewing part of it but maybe it’s because my machine is bulky and hate pulling it out.  It’s so beautiful!

Found this on The Creative Place, my newest favourite craft blog!

DIY Tuesday: 3D Spring Flowers Card

Saturday, April 23, 2011

Carrot Placeholder for Easter Tutorial


segnaposto-pasqua

Carrot Place Card Tutorial by mammafelice

One of my posts of my clothespin crafts gave one of my readers an idea for this simple but provoking place card!  I’m honoured that something I wrote inspired the creativity of fellow blogger

Okay, it’s in Italian, but it’s straight forward Smile

Saturday, April 16, 2011

Message in A Egg Tutorial

This is a chain tutorial –> Charlottesfancy to Poppytalk to PresentandCorrect to my blog Smile. 

4482227274_1b04dedaf1

Message in a Egg Tutorial by PresentandCorrect

It’s like a Fortune Cookie but with an egg shell. 

Monday, April 4, 2011

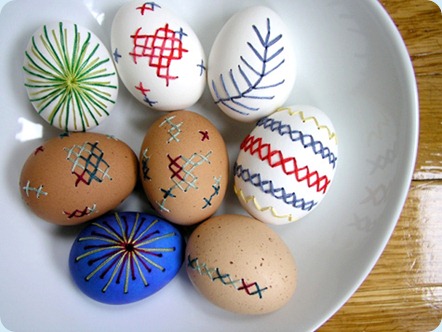
Embroidered Eggs –Tutorial

eggs_detail

Embroidered Egg Tutorial by Brett Bara

I saw this tutorial last year just after Easter.  I was completely blown away as I’ve never seen embroidered eggs before.

Monday, March 21, 2011

Tutorial: Spring Bouquet

Bouquet4

Spring Bouquet by Kelly Purkey

I love these flowers, a perfect springtime craft!  Click on the link or title to see the tutorial

Wednesday, March 9, 2011

How to make Tissue Foil (Using Thai Unryu Paper) by Tadashi Mori

I don’t make foil paper very often because it’s labour intensive, however, how Tadashi Mori makes his is the simplest that I’ve seen so far.  He’s using high quality paper, which makes a difference. 

If you make some, please send me pictures of what you made with this foil!

Tuesday, March 1, 2011

Tutorial: Bitty Bug Pincushion

DSC_0372 (2)

Bitty Bug Pincushion – By Lauren @ Goody-Goody

I am not a seamstress and when I try to sew, I’m not a very good one.   However, when I saw this cute handmade pincushion, I loved it!  So cute!   Alas, this is a craft I might never do, but I had to share it. 

Monday, February 14, 2011

Tutorial: Flower Clips

[tutorial+cover.jpg]

Flower Clip Tutorial by Joanne

Adding to my strange addition to clothespin crafts…  this craft does require circle and scallop punches.  I don’t have these specific tools but I do have a cherry blossom punch.  I’ll definitely put my own spin on my flower clothespins.  Another item on my, craft bucket list!

Friday, January 14, 2011

Tutorial: Clothespin Valentine by Brown Paper Packages

This is one of my “meaning to do” craft list.  I have a slight addiction to clothespin crafts.  This tutorial is by Kierste who runs Brown Paper Packages!

Tutorial: Clothespin Valentines

clothespin_valentine

Saturday, December 11, 2010

Tutorial: Paper Christmas Wreath

Since it’s Christmas time, just surfing to see any great craft ideas.

This wreath is so striking and made from one of my favourite mediums, paper!  This is a tutorial by Lisa Tilse a busy mom, blogger and entrepreneur who runs owns The Red Thread

Her blog is full of tutorials and the few that I did scan through were so beautiful.  I’ll definitely checking more out soon!

Paper Christmas Wreath Tutorial by Lisa Tilse

Saturday, December 4, 2010

Tutorial: Mini Clothespin Snowmen

 Mini Clothespin Snowmen

Lately I’ve been addicted to clothespins and clothespin crafts and I stumbled upon this cute tutorial by a fellow blogger Eyeballs by Day, Crafts by Night.  Click on the picture or the title to check it out!

I love her pseudo name

Tuesday, August 10, 2010

How to Add Google Analytics to your Facebook Fanpage

analytics_logo I posted this in June 2010 on my Cindy Ho Designs Blog.  I hope this will be helpful to the Etsy community!

How to Add Google Analytics to your Facebook Fanpage

Tuesday, July 27, 2010

On Paypal: How to Implement a One Question Survey

pablo

Back in June of  2010, I did a quick blurb of how to implement a one question survey on PayPal.  Enjoy!

How to Implement a One Question Survey

Friday, April 16, 2010

Build A Facebook Fan Page by Ryan AcAbery of littleputbooks

I was reading through Etsy's Forums tonight and stumbled upon a tutorial by fellow seller Ryan AcAbery of littleputbooks.   It's something that's it's great to pass it forward for everyone!

I simple copy and pasted her tutorial in green:

  1. Log into your regular "your name" Account.
  2. Go back to this thread and click this link: http://www.facebook.com/pages/create.php
  3. Click brand/product- online store, do not register as a non profit.
  4. Choose a name, preferably your Etsy business or website name.
  5. Mark the "official page" check box and click "create official page." box.
  6. Right below the "become a fan" button is the "wall" tab and the "info" tab. Click the info tab and then "edit information" - Under basic info put in the year your business started.
  7. Click "detailed info" - Under website put the http:// URL for pointarenapintos or photographicart. Also list the email you want associated with the page, in the next line, under website.
  8. Company overview- to make stuff and sell it.
  9. Put in your mission. (to make more stuff and sell more of it!)
  10. You can list products or leave it blank.
  11. Hit "done editing."
  12. Hit the little + sign next to the wall and info tabs. Add a photos tab. This is where you can upload "photo albums" and show off your products or fun photos (studio shots, favorite stores and so on).  As long as you upload pictures that are smaller than 500x500 people should not be able to reproduce them.   You should also upload single pictures to your wall to keep your fans engaged. I will cover that at the end of this post.
  13. Hit "edit page" on the left under the question mark.
  14. Under settings, Enter a country (US.)  Leave age restrictions 13+, Published (you can click for it to be unpublished until you feel ready) Click Save Changes
  15. Wall Settings - If you put only posts by page, only what you post will be seen by your fans. If you put by page and fans any fan posts will be seen by all. It is best to let your fans post too. You can keep the default setting - "posts by wall" and people will have to click to see posts by fans and you- this is best if people put lots of spam posts on your wall.
  16. Ignore everything else, it's fine the way it is
  17. Go back to the question mark at top of Edit page and click it- this will take you back to the fan page.
  18. Once you are on the page click the "?" and hit "change picture" this will allow you to upload your profile picture. Once you have done this you are ready to start posting and "publish" your page.
  19. Under your new profile picture there is a link that will say "suggest to friends". Click this and then click on everyone in your "friends" folder and hit send invitations. You should also "follow" up with a personal message asking all your friends to share the page and help build support for your business.
Suggestions:
  • Add 1-3 photos a week
  • Ask fans about to share their opinions, similar works, input.
  • Do share your new "product related" blog posts
  • Do lets fans know if you are having a sale or new product launch.
  • Do not always post links to your website, it is better to engage your fans and let them support you on their own.
  • Do not "fan" other pages just to add your own page. (yech)
The end.
 
I've already built my own fanpage, but never realized that others needed a tutorial.  In addition to her insight, her products are simply gorgeous!


Saturday, April 10, 2010

How to link your blog to your Facebook fanpage

Yes you can use the 'Notes' application to import your blog feed,  however, I wanted to have more control of how the blog represented itself on my fanpage.  There are quite a few blog import Facebook applications, but I like to use Blogtab because it's simple to install so you can include your blog updates within your Facebook profile or fanpage.  Just wanted to share with anyone who is also new
  1. Go to the Blogtab Application
  2. Click the "Add to my page" in the left column. Select the page you want to add the application
  3. Click on "Go to Application"
  4. In field, enter your blog feed URL.  Since I use blogspot, I followed this link.  I used the full site feed since my entire blog is based on my business.  If your blog is a personal business mix, you can have it label specific.  If you don't use blogspot, check with your blog provider on what feed URL you should use.
  5. Click on the "Pages" tab on the right and authorize the fanpage you want the blog to have your feed
  6. Go to you fan page and click the "+" sign and add the Blog Tab.
  7. The blog tab should show up on your page.  If you have the correct feed url your Blog updates should then appear in your fan page just as it does in your profile.

Friday, November 20, 2009

How to Add Google Analytics to Your Blogger Blog

For all of you who own blogs, this is a clear and concise tip authored by professional blogger, Andy Wibbels, and to add google analytics to your Blogger blog but you don't need to be an HTML expert to do it.
http://andywibbels.com/

I was searching everywhere on google and blogger to figure out to do this.  It was so refreshing that this person writes in layman's terms.  He posted instructions on three blog formats:
On a side note, I really enjoy his blog, alot of the articles are quite humourous, definately informative.  I'll start following it and share anything that might help out fellow on-line business colleges.